Your Cart is Empty

There is nothing more frustrating than having all the ingredients picked out for a gourmet dinner, the counters cleaned for preparation, pulling your knife out of the block—and discovering that it does more squashing than slicing. If you do not know how to sharpen your kitchen knives with a whetstone, it may be tempting to throw your knives in the trash and purchase a new set.
Honing your knife with a stone involves a series of steps that include choosing the appropriate stone, preparing the stone for use, and running the blade's edge along the stone’s surface.
With experience, honing a knife can become an art, with many sharpened blades more effective than those that are brand new. However, without following the proper steps, attempts to hone your knife can actually cause more harm than good, so do not try sharpening your favorite kitchen knives until you have developed some skill and are confident in your abilities.
Many excellent online tutorials can provide video instructions on how to hone a knife, choose the correct stone, prepare the stone for use, and run the blade along the stone’s edge to get the desired finish.
We’ve included these detailed steps below to help you through the process.
While the image of throwing a tomato in the air and slicing it five times before it reaches the counter may be possible only in cartoons in tailored infomercials, a good, sharp kitchen knife should definitely be able to pass through food with little resistance.
Therefore, before breaking out the whetstone, be sure to test your knife on a piece of fruit. A tomato is ideal, as its thin outer membrane will pose little challenge for a sharp knife but will provide a troublesome barrier for a knife that has lost its edge.
When testing your knife, ask yourself the following questions:
The more strongly you can answer in the affirmative to these questions, the duller your blade is. Knowing your blade's dullness is important because it will influence the level of grit required on your whetstone to get it sharp again.
If you do not have a piece of fruit available for testing purposes, the following tips may help you determine whether your knife needs to be honed:
There are many types of whetstones, both natural and synthetic, that can help you sharpen your kitchen knife. There is no right or wrong answer to which style of stone you should choose, but each type will come with certain strengths and weaknesses.
The following breakdown looks at the pros and cons of popular styles of whetstones:

If you are a casual user of knives at home, you will likely use either an oil stone or a wet stone. If you use them with great frequency or operate an industrial kitchen, an investment in a diamond stone may be worthwhile.
Within the overarching styles listed above, stones will be further classified based on their grit, such as coarse, medium, or fine. It is not uncommon for casual knife users to see a stone with a coarse grit level on one side and a fine grit level on the opposite side.
A general rule is that very dull knives should be honed with a coarse stone first and finished with a fine stone. If your knives have been recently sharpened and are still in decent shape, you can skip the coarse stone and simply finish the edge with a medium or fine grit level.
If you are completely new to choosing grit levels for a stone, the following breakdown will help you while you are making your selection:
After determining your knife's dullness and selecting a style and grit of sharpening stone, it is important to read the user’s manual accompanying the product before proceeding, especially if you plan to use a wet or oil stone. With such a wide variety of stone possibilities, using your stone with the incorrect oil or not soaking it in water long enough can damage your materials, causing knicks and scratches to the knife or stone.

Lay a well-wrung washcloth on a level surface, placing your stone of choice on top. If it is a double-sided stone, make sure the side you want to use first is facing up. Ensure that the space is not too confined, as you will need a good range of motion as you run the blade across the stone.
It does not matter which style of stone you are using (wet, oil, or diamond)—it must be placed on the damp cloth. The cloth is important because it will hold the stone in place during sharpening. Placing the stone directly on the work surface could cause slipping as the blade slides across the stone, which may lead to an injury.
The grit from the stone will likely cause staining in the cloth, so be sure to use something that you do not mind getting dirty.
If you properly prepared your wet stone, no additional steps are needed here. However, an oil stone will need to be oiled after it is placed on the cloth. The following are some tips for adding oil to your oil stone:
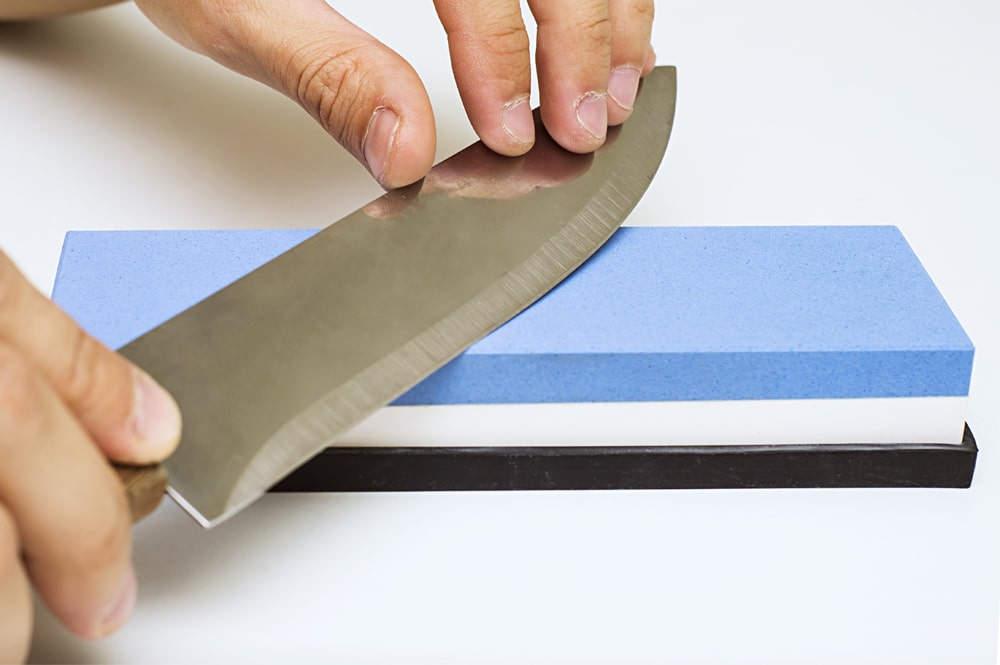
As most straight blades must be sharpened at a 20-degree angle, it is important that you get some practice holding the knife in this position before actually bringing it in contact with the stone. To get an idea of what a 20-degree angle looks like, take the following steps:
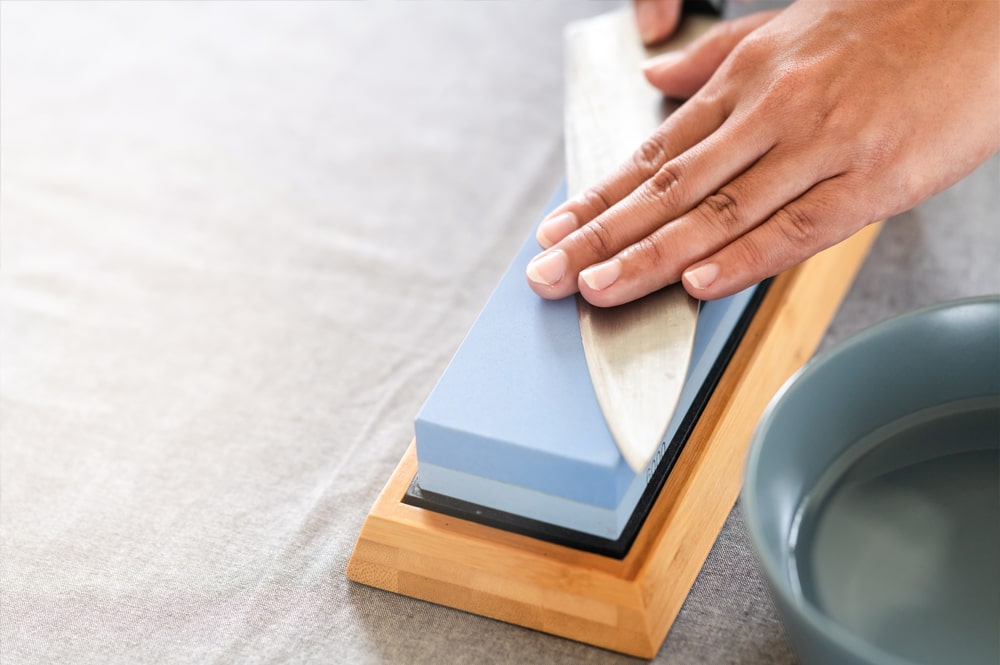
Using one hand, tilt the knife so that the blade is at a 20-degree angle, with the blade's edge facing away from you. Place the fingertips of your other hand on the flat part of the blade near the sharp end. Keeping your fingertips on the flat end of the knife can provide a stabilizing effect, helping control the pressure and direction of the blade as you guide it along the stone.
Now that the stone is prepared and everything is in place, it is time to start the actual sharpening process. Take the following steps to get the desired result:
Flip the knife over and follow the same process as that of the first side. When putting the finishing touches on the blade, be extremely careful, as both honed edges could lead to an accident if you get careless.
If you had been honing a very dull knife, it is time to switch from a coarse grit level to a fine grit level to put the finish on your blade. Double-sided whetstones can usually be flipped over and used, while separate stones should be prepared using the same steps listed above.
Note: With double-sided wet stones, check to ensure that the fine side has not dried out; if it is dry, dip it in water before use. For oil stones, add more oil to the fine side as needed.
Before putting away your knife and cleaning up your stone(s), it is important to test and see if you have gotten it to the desired level of sharpness. As mentioned earlier, a piece of fruit like a tomato works well, but you can also use a piece of paper for an extremely quick test.
When holding a piece of paper in front of you with one hand, a sharp knife placed at the top edge should slice all the way through when only a little force is applied. If the blade is still dull, the pressure will cause the paper to fold over on itself.
If you find your knife needs more of an edge, repeat the previous steps, as necessary.
Many knife fans like to keep their knives sharp, to the point where even the slightest touch can draw blood if you’re not careful. While there is no downside to keeping your blades this sharp, the general rule is that your knife should be “sharp enough to do the job.”
For meat knives, this means being able to cut through fat, tendons, and gristle with minimal effort. For fruits and vegetables, you should be able to effortlessly make consistent cuts without squashing the item during the slicing process.
As you work to hone your kitchen knife to the appropriate level, it is important to remember that if the blade is being used correctly and in a safe environment, sharp knives are actually safer than dull knives.
A sharp knife allows you to slice and make your cuts in a controlled, calculated manner. Dull knives that require a lot of force leave you at risk of seeing the knife slough off and chop something unintentionally. Dull blades can also lead to frustration that causes you to lose focus and do something unsafe.
After you have the edge of your knife honed to the desired sharpness, it is important to clean both the blade and the stone to prevent rust or corrosion. The following cleaning and storing tips can help you keep your knife sharp:
Honing a knife can become a sort of hobby, with the blade's glide across the whetstone a form of therapy for some people. As such, it is not uncommon to see some knives sharpened daily.
However, it is important to note that you are taking a small part of the blade’s steel with it every time you hone a knife. Therefore, high-frequency, aggressive sharpening can actually whittle the blade down to nothing if this pattern is repeated over many years.
In terms of general rules, knives made from stainless steel should be honed after every 2 to 4 uses, while blades fabricated from carbon-based steel can be sharpened every other use. If this pattern is maintained with consistency, you should only have your knives professionally sharpened every other year.
One final note on the frequency of honing: if you have a favorite knife showing visible signs of wear, do not try to use a hard stone for honing. Use the softest wet stone possible and reduce the frequency of honing, applying as little force as possible during the process.
If you are a complete beginner to knife sharpening, there are a few points that may be easy to overlook and cause frustration as you attempt to get an edge on your blade. Avoid the following mistakes as you start your knife-honing journey:
The most glaring mistake that beginners make when sharpening a knife is seeing a whetstone and immediately using it with their knife without knowing if it’s the proper type of stone for their blade.
As you have seen, not all stones are created equal, and if you do not understand what you are trying to accomplish during the honing process, the result of using the same stone for all occasions can be maddening.
Choosing a coarse stone for a small blade that needs only a minor touch-up can cause you to wear down the edge prematurely, while using a fine stone for an extremely dull knife will take hours, with the stone likely to wear out long before the blade ever gets sharp.
If you have a large stone and need to sharpen a small knife, you should be fine. However, if you have a small stone meant for sharpening pocket knives and everyday carries, you might run into some trouble trying to work with a full-length kitchen knife.
As honing your knife requires you to run it in a sweeping arc along the stone that roughly replicates that slicing motion, you will likely run out of real estate before reaching the knife’s tip when using a short stone.
Therefore, it is recommended that all stones used for honing kitchen knives be at least eight inches long.
Wet stones that use water as a lubricant are soft and allow the blade to dig into them during sharpening. Conversely, oil stones are hard and need the blade to glide across the surface to create the edge.
If you are out of oil for your oil stone, do not try to cut corners and lubricate it with water. This will actually increase the stone's stickiness, leading to chipping and scratching of both the stone and the knife blade.
While the general rule is that you should run the knife along the stone at a 20-degree angle, this is not always the case:

If you have no experience honing knives, it is highly recommended that you do not make your maiden voyage with your favorite kitchen knife. Finding the right angle and getting the right stroke can be challenging in the beginning. If you have a good knife, it is possible to make it worse or even ruin it by sharpening it incorrectly.
As such, develop your sharpening skills using a lesser knife in the beginning. Once you are confident you have the process under control, then you can graduate to sharpening higher-quality products.
For most users, a whetstone will last forever. Given the proper care, it is highly unlikely that you will ever wear through a stone. Even if you are a high-volume chopper and use your stones every day for some kind of sharpening purpose, a well-cared-for one will last you many years.
With that said, there are a few factors to keep in mind that may lead you to need a replacement:
While the process for honing a knife may differ slightly from person to person, the general steps will involve choosing the appropriate stone, preparing the stone for use, and running the knife’s blade along the stone’s surface.
A sharp knife should be able to slice through a regular piece of paper with minimal effort. To keep your edge sharp, store it in a dry, protected environment. Hone stainless steel blades every two to four uses and carbon steel blades after every other use for maximum effectiveness.
Chef's Vision is an Amazon Associate and earns from qualifying purchases.